[教程醒目]苏芳头像的做法
2003-06-25 09:18 | 东方夷
在双头之狼和路路的威逼利诱之下,偶又做了一个教程--b,希望大家能够从中学到一些东西的说~
以下处理所用软件为photoshop7.0和FireworksMX,都是英文版的说~
原来的素材:

下面就是我的教程:
1.首先用ps对原图进行一些处理
a.用image-->adjustments-->autolevel对图象的线条进行加深,保存备用(暂时存为sf1.jpg)。

加深后的图

b.再对加深后的图用filter-->blur-->radial blur进行加工,保存备用(暂时存为sf2.jpg)


处理后的图

c.ps的保存图象的方法请看下面的图示

ps的部分完成了,下面进入fw的部分
2.新建一个符合头像规格的文件

3.打开刚才保存的sf1.jpg和sf2.jpg,然后在图示所在的地方对图片进行调整,并将他们粘贴到新建的文件里
如果出现图示的对话框,请选择Don't Resample

4.在frames面板里添加11帧备用

5.把刚才复制过来的两张图片分别复制到第5、7帧的layer1里并把经过滤镜处理过的图片的透明度设为50%(注意请保证,这张图片在另外一张图片的上面)
这样是为了有两帧平滑过渡

6.在第6帧里仅复制加深处理的图片
7.在第1帧和第8帧的layer1下仅复制经过滤镜处理的图片,不要改动透明度,保持100%
8.在第1帧的图片上按f8出现如图所示的对话框,选择Animation

在接下来的对话框里按照图示设置

9.同理在第8帧的图片上按f8,设为Animation,按图示设置动画效果,请注意红框部分,与上面那步的不同的地方

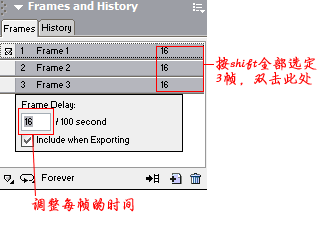
10.现在对每帧的时间进行调整,把第6帧设为300,第111帧设为125,其他的设为20。
具体的调整方法:选中frame面板里的全部11帧,并双击图示位置,调整帧的停留时间
(注意每调整一次最好,按F12预览一次直到自己觉得满意为止)
(如果有人预览时图片不动,请在Optimize面板下,选择Animated GIF,既动画gif,再进行预览)
11.在第1帧里添加一层layer2并在layer2里添加名字、SQUARECN和边框,并按图示方法对layer2进行共享

12.一切妥当后,按shft+ctrl+x或者file-->export preview,进行导出前的最后调整。(目的是为了控制导出文件的大小)

13.最后是导出的效果


呼呼~~总算完工了~~由于这次做的效果比较的复杂,所以不进行调整的文件肯定大于30k,所以请大家尽量少用比较复杂的颜色来控制导出文件的大小~
总觉得,我做的教程只能做一些特殊的头,不像狐狸的教程很大众化的说~--b
希望大家能够从我的教程中学到一些对作头有用的启发~~有什么不妥的地方请大家提出~~~
-
东方之地,唯我不败。
天下风云出我辈,一入江湖岁月催;
皇图霸业谈笑间,不胜人生一场醉。


以下处理所用软件为photoshop7.0和FireworksMX,都是英文版的说~
原来的素材:
下面就是我的教程:
1.首先用ps对原图进行一些处理
a.用image-->adjustments-->autolevel对图象的线条进行加深,保存备用(暂时存为sf1.jpg)。
加深后的图
b.再对加深后的图用filter-->blur-->radial blur进行加工,保存备用(暂时存为sf2.jpg)
处理后的图
c.ps的保存图象的方法请看下面的图示
ps的部分完成了,下面进入fw的部分
2.新建一个符合头像规格的文件
3.打开刚才保存的sf1.jpg和sf2.jpg,然后在图示所在的地方对图片进行调整,并将他们粘贴到新建的文件里
如果出现图示的对话框,请选择Don't Resample
4.在frames面板里添加11帧备用
5.把刚才复制过来的两张图片分别复制到第5、7帧的layer1里并把经过滤镜处理过的图片的透明度设为50%(注意请保证,这张图片在另外一张图片的上面)
这样是为了有两帧平滑过渡
6.在第6帧里仅复制加深处理的图片
7.在第1帧和第8帧的layer1下仅复制经过滤镜处理的图片,不要改动透明度,保持100%
8.在第1帧的图片上按f8出现如图所示的对话框,选择Animation
在接下来的对话框里按照图示设置
9.同理在第8帧的图片上按f8,设为Animation,按图示设置动画效果,请注意红框部分,与上面那步的不同的地方
10.现在对每帧的时间进行调整,把第6帧设为300,第111帧设为125,其他的设为20。
具体的调整方法:选中frame面板里的全部11帧,并双击图示位置,调整帧的停留时间
(注意每调整一次最好,按F12预览一次直到自己觉得满意为止)
(如果有人预览时图片不动,请在Optimize面板下,选择Animated GIF,既动画gif,再进行预览)
11.在第1帧里添加一层layer2并在layer2里添加名字、SQUARECN和边框,并按图示方法对layer2进行共享
12.一切妥当后,按shft+ctrl+x或者file-->export preview,进行导出前的最后调整。(目的是为了控制导出文件的大小)
13.最后是导出的效果
呼呼~~总算完工了~~由于这次做的效果比较的复杂,所以不进行调整的文件肯定大于30k,所以请大家尽量少用比较复杂的颜色来控制导出文件的大小~
总觉得,我做的教程只能做一些特殊的头,不像狐狸的教程很大众化的说~--b
希望大家能够从我的教程中学到一些对作头有用的启发~~有什么不妥的地方请大家提出~~~
谢谢
-
东方之地,唯我不败。
天下风云出我辈,一入江湖岁月催;
皇图霸业谈笑间,不胜人生一场醉。
![]()
Lv.15 Fantasy
Red Magcian